さて、せっかくいろいろと設定して立ち上げたタイルサーバーですので、公開してみたいと思います。 自宅サーバーの公開なんて、滅多にやらないので、問題なさそうな範囲でやったことまとめておきます。
IP アドレスを固定化
IPアドレスはDHCPで割り振っているので、まずこれを固定IPアドレス(LAN内なのでプライベートアドレス)にします。
/etc/network/interface を編集すればOK。変更前はこんな感じ
mor@map:/etc/network$ cat interfaces
# This file describes the network interfaces available on your system
# and how to activate them. For more information, see interfaces(5).

source /etc/network/interfaces.d/*

# The loopback network interface
auto lo
iface lo inet loopback

# The primary network interface
auto enp2s0
iface enp2s0 inet dhcp

mor@map:/etc/network$
dhcpの部分をstaticにして、IPアドレスなどの設定を追加します。
# The primary network interface
auto enp2s0
# Change a method getting IP address
# from DHCP to static setting.
#
# 2018/8/31, Junichi MORI
#iface enp2s0 inet dhcp
iface enp2s0 inet static
address 192.168.xxx.yyy
netmask zzz.zzz.zzz.zzz
gateway デフォルトゲートウェイのIPアドレス
dns-nameservers DNSサーバーのIPアドレス

mor@map:/etc/network$
設定出来たら、再起動して、 ifconfig で確認しておきます。
mor@map:~$ ifconfig
enp2s0    Link encap:イーサネット  ハードウェアアドレス xx:xx:xx:xx:xx:xx
          inetアドレス:192.168.xxx.yyy  ブロードキャスト:192.168.xxx.255  マスク:zzz.zzz.zzz.zzz
          (略)
mor@map:~$
問題なさそうですね。
Web サーバー関連の設定
Web サーバーのポート番号変更
このタイルサーバーですが、特定の(自分で作った)アプリケーションからのみアクセスすることを想定しているので、ポート番号を変えておきます。
apache2 が Listen するポートを変更します。
/etc/apache2/ports.conf
mor@map:/etc/apache2$ cat ports.conf
# If you just change the port or add more ports here, you will likely also
# have to change the VirtualHost statement in
# /etc/apache2/sites-enabled/000-default.conf

#Listen 80
Listen xxxx

<IfModule ssl_module>
        Listen 443
</IfModule>

<IfModule mod_gnutls.c>
        Listen 443
</IfModule>

# vim: syntax=apache ts=4 sw=4 sts=4 sr noet
mor@map:/etc/apache2$
バーチャルホスト設定も併せて変更します。
/etc/apache2/sites-available/000-default.conf
mor@map:/etc/apache2/sites-available$ cat 000-default.conf
<VirtualHost *:xxxx>
        # The ServerName directive sets the request scheme, hostname and port that
        (略)
</VirtualHost>
設定ができたら、apache2 を再起動します。
mor@map:~$ sudo service apache2 restart
参考
ubuntu + apache2 で8080ポートも併用する場合 - プログラミング備忘録
Ubuntu14.04 でApache2 設定ファイルの場所(ポート番号変更) - Name Not Found
Apache バーチャルホスト説明書 - Apache HTTP サーバ バージョン 2.4
サーバー情報が出るのを抑える
存在しないページを表示した際、エラーページが表示されますが、そこにサーバーのバージョン番号等が載っています。

なので、これを非表示にします。/etc/apache2/conf-available/security.conf を開いて
#ServerSignature On
ServerSignature Off
ServerSignature を Offにしておきます。
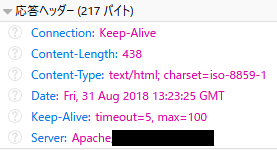
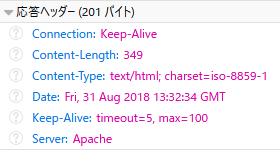
同じく、レスポンスヘッダにもサーバーのバージョンが載っています。

これも Apache のようにソフトウェア名だけにしておきます。 同じく、 /etc/apache2/conf-available/security.conf を開いて
#ServerTokens OS
ServerTokens Prod
ServerTokens を Prod に変更します。
設定変更を保存後、
mor@map:/etc/apache2/conf-available$ sudo /etc/init.d/apache2 restart
[ ok ] Restarting apache2 (via systemctl): apache2.service.
mor@map:/etc/apache2/conf-available$
で設定ファイルを反映して、さきほどと同じく存在しないページを表示すると


のようにバージョン番号を表示しなくなりました。
ssh の設定を変更
公開前に、 ssh 接続を見直します。主な設定内容としては、
- ポート番号を変更
- パスワード認証を禁止
- 公開鍵認証のみを許可
- 接続可能ユーザーを限定(ルートはもちろん禁止)
sshd_config の変更箇所は下記のような感じになりました。
mor@map:/etc/ssh$ diff sshd_config.org sshd_config
5c5,6
< Port 22
---
> #Port 22
> Port xxxxx
25a27,29
> # user restriction
> AllowUsers ユーザー名
>
28c32,33
< PermitRootLogin prohibit-password
---
> #PermitRootLogin prohibit-password
> PermitRootLogin no
52a58
> PasswordAuthentication no
mor@map:/etc/ssh$
設定変更後は、
mor@map:/etc/ssh$ sudo sshd -t
設定ファイルのテストをして問題なければ、
mor@map:~$ sudo systemctl restart ssh
でsshdを再起動します。
なお、パスワード認証を無効にする前に、別途公開鍵を作り、一度、クライアントから接続して公開鍵でログイン出来ることを確認しておきます。 そのあとで、パスワード認証を無効にします(設定ミスでログインできなくなる、というのを避けたいためです)。
参考
Ubuntu 16.04 LTS : SSHサーバー : SSH 鍵認証 : Server World
sshd_config&PAMの設定 | OpenGroove
ファイアウォールを設定
自宅のLAN内で使っている分には、ファイアウォールとかもそんなに気にしなくてよかったのですが、公開するのでちゃんと設定してみます。 Ubuntu は iptables で設定ができるそうです。でも、直接 iptables コマンドで操作しなくても ufw というツール経由で設定するのが楽とのことなので、これで試してみます。
mor@map:/etc/ufw$ sudo ufw status
状態: 非アクティブ
mor@map:/etc/ufw$ sudo ufw default DENY
デフォルトの incoming ポリシーは 'deny' に変更しました
(適用したい内容に基づいて必ずルールを更新してください)
mor@map:/etc/ufw$ sudo ufw allow "Apache for Public"
ルールをアップデートしました
ルールをアップデートしました(v6)
mor@map:/etc/ufw$ sudo ufw allow "OpenSSH for Public"
ルールをアップデートしました
ルールをアップデートしました(v6)
mor@map:/etc/ufw$ sudo ufw limit "OpenSSH for Public"
ルールをアップデートしました
ルールをアップデートしました(v6)
mor@map:/etc/ufw$ sudo ufw status
状態: 非アクティブ
mor@map:/etc/ufw$ sudo ufw enable
Command may disrupt existing ssh connections. Proceed with operation (y|n)?
ファイアウォールはアクティブかつシステムの起動時に有効化されます。
mor@map:/etc/ufw$ sudo ufw status
状態: アクティブ

To                         Action      From
--                         ------      ----
Apache for Public          ALLOW       Anywhere
OpenSSH for Public         LIMIT       Anywhere
Apache for Public (v6)     ALLOW       Anywhere (v6)
OpenSSH for Public (v6)    LIMIT       Anywhere (v6)

mor@map:/etc/ufw$
limit を使うと30秒間に6回以上の接続が合った場合に制限がかかります。ブルートフォースアタック対策ですね。
この時点で、一度、再起動して、設定を有効にします。 WebサーバーとSSHが問題なくつながりますね。
application について
上記の設定はポート番号を直接指定するのではなく、"Apache for Public" とか "OpenSSH for Public" とかのアプリケーション名で指定しています。 これらは、/etc/ufw/application.d 以下にアプリケーション定義を作成して、その名前使って設定しているものになります。
例えば、 "OpenSSH for Public" というアプリケーション名は、/etc/ufw/application.d/openssh-server-for-public というファイル(ファイル名は任意っぽい)を作成して、そこで定義しています。 ちなみにその中身は、
mor@map:/etc/ufw/applications.d$ cat openssh-server-for-public
[OpenSSH for Public]
title=Secure shell server, an rshd replacement
description=OpenSSH is a free implementation of the Secure Shell protocol.
ports=xxxxxx/tcp
mor@map:/etc/ufw/applications.d$
という感じです。 "Apache For Public" も同じですね。
あと、若干微調整しておきます。
IPv6 の削除
/dev/default/ufw を編集して、IPv6を無効にします。
mor@map:/etc/default$ cat ufw
# /etc/default/ufw
#

# Set to yes to apply rules to support IPv6 (no means only IPv6 on loopback
# accepted). You will need to 'disable' and then 'enable' the firewall for
# the changes to take affect.
#IPV6=yes
IPV6=no
SSH の接続元を限定
SSH 接続はローカルLANからのみ認めるものとします。また、ローカルLANからの接続もLIMITをつけておきます。
mor@map:/etc/default$ sudo ufw limit from 192.168.xxx.yyy/zzz to any app "OpenSSH for Public"
ルールを追加しました
mor@map:/etc/default$ sudo ufw status
状態: アクティブ

To                         Action      From
--                         ------      ----
Apache for Public          ALLOW       Anywhere
OpenSSH for Public         LIMIT       Anywhere
OpenSSH for Public         LIMIT       192.168.xxx.yyy/zzz

mor@map:/etc/default$ sudo ufw status numbered
状態: アクティブ

     To                         Action      From
     --                         ------      ----
[ 1] Apache for Public          ALLOW IN    Anywhere
[ 2] OpenSSH for Public         LIMIT IN    Anywhere
[ 3] OpenSSH for Public         LIMIT IN    192.168.xxx.yyy/zzz

mor@map:/etc/default$ sudo ufw delete 2
削除:
 limit 'OpenSSH for Public'
操作を続けますか (y|n)? y
ルールを削除しました
mor@map:/etc/default$ sudo ufw status
状態: アクティブ

To                         Action      From
--                         ------      ----
Apache for Public          ALLOW       Anywhere
OpenSSH for Public         LIMIT       192.168.xxx.yyy/zzz

mor@map:/etc/default$
参考
第76回 Ubuntuのソフトウェアファイアウォール:UFWの利用(1):Ubuntu Weekly Recipe|gihyo.jp … 技術評論社
第77回 Ubuntuのソフトウェアファイアウォール:ufwの利用(2):Ubuntu Weekly Recipe|gihyo.jp … 技術評論社
iptablesについて
ファイアウォールiptablesを簡単解説~初心者でもよくわかる!VPSによるWebサーバー運用講座(4) | さくらのナレッジ
ルータの設定(静的IPマスカレードの設定)
ここまで設定が終わったら、外部からのアクセスを受け付けるために、ルータのIPマスカレードを設定します。 ルータの特定のポートに来たものを、このタイルサーバーに投げるという設定です。
下記のマニュアルを見て設定しました。
NetGenesis GigaLink1000 ユーザーズマニュアル 第4版
動作確認
ここまでできれば、最後は動作確認を行います。 Leaflet を使って地図を表示する際に、
sample.mymap = L.map('map').setView([34.5007, 136.7058], 13); var tile_layer = L.tileLayer('http://タイルサーバーのIPアドレス:ポート番号/{z}/{x}/{y}.png', { attribution: '© <a href="http://openstreetmap.org">OpenStreetMap</a> contributors', maxZoom: 20 }); tile_layer.addTo(sample.mymap);
のように、公開したタイルサーバーを指定します。
ブラウザ表示させると、無事に地図が表示されています。 めでたしめでたし、でした。
あとは、おいおい様子を見ていきたいと思います。